Hello there!
Today’s post is a long one. First, I want to talk about why I’m writing this blog and then, I’ll share an overview about my process when I first started, and leave you with a checklist to get started yourself!
When I first started drawing, I had no thought of ever selling my work. In the last couple of years I started to get those “what if” thoughts. Towards the end of 2016 I decided to finally take it seriously and really research how to go about making prints and selling. I had no idea what was involved. I didn’t know anything. I’m not a super computer savvy person. But I figured it out, and so can you!
One of the major frustrations I had when researching was people not wanting to give away their “secrets.” It started to seem like the more I researched the less I could find that was actually helpful. It was a never ending cycle of research. So much advice assumed that I was supposed to know how to get my art from the desk to the computer. I didn’t know how to do that. People would say “edit it,” I didn’t know what that meant. The advice would say just experiment and test things out. What does that even mean anyway? How did that apply to making prints?! Sure it makes sense now, but at the time I didn’t know what to experiment with. I am a person that still uses pen and paper to write my lists on. I’m not naturally a computer person. I would much rather be sitting at my desk drawing. Although it has been a long road, I’m finally to the point where I can look at what I’ve learned and be excited about it.
I want to help others who are in that place of wanting to start but just don’t know how or where or what to do. I am not an expert. This blog is not a “how to” per se. I’m just going to share what has worked and not worked for me. I’ll be giving pointers and advice along the way. Feel free to toss out anything that doesn’t work for you. There is no “right” way to do this. There are a lot of methods that will get you to the same place. Feel free to ask questions and share your opinions.
Alright enough of that! Let’s start getting into the fun stuff!
The first step is to have a completed piece of artwork. Then you have to decide how you want to get it to the computer. Here are the picture taking tools I had to choose from to start with:
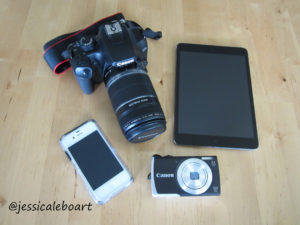
My iPhone is very old. It’ll get replaced when it dies, but it is obviously out for picture taking!
My iPad is slightly newer, but still out.
Point and shoot camera works for random everyday type pictures but I’ve read they are not for good quality reproductions.
Lots of people say to use a DSLR. Hey, I own one of those already! Better yet if you have a zoom lens. Perfect , I have one of those too!
And last, but unfortunately not least, a regular old desktop computer.
**I feel like I should stop here and add a bit of a personality insight. I don’t really have a problem spending money on items that I want or enjoy. But I am a use it until it breaks or dies or has holes or rots or… you get the idea, kind of person. If it still functions, why spend money to replace it?! I can also be quite cheap and hate spending money uselessly. (Well, unless we’re talking about drawing paper or cheap art supplies, then I tell myself I need it!)
With this in mind, my thinking on how good my equipment was to start was waaaay off. I kept thinking I could make it work with what I had. For some things this may be ok, but for others not so much. We’ll be getting deeper into this in time!
Unfortunately I do not own a tripod. I looked into getting one, but couldn’t justify the cost at this point. My camera with the zoom lens is a bit heavy and reviews for cheap tripods scared me away. So I created a lovely makeshift set up that propped the camera up, carefully researched the correct manual settings for my camera, was careful to use the self timer to make sure there was no added camera shake, and took pictures. My main issue was with uneven lighting. A lighting set up costs a lot, and again I couldn’t justify cost at this point. It is hard to tell if your picture is evenly lit until it’s on the computer. So I spent a lot of time going back and forth from picture taking to computer and repeat and repeat before getting a good capture. I tried taking pictures outside, but that didn’t solve the lighting problem either. And I’m not sure about where you live, but where I’m at never seems to have perfect outdoor picture taking weather. It’s supposed to be cloudy, but bright. It seems to always be too sunny, too rainy, too windy, too many bugs or birds, etc. Who knows how large my artwork stack would be waiting for the perfect day.
For editing I went with a program called Gimp at first. It was free and although took me a while to figure out, worked quite well. Why do you need to edit your pictures anyway? Here are a couple of examples pictures that first come off of the camera card. Aside from needing cropped, the whites aren’t white, the blacks aren’t black, and they are overall just blah.
Don’t panic if you don’t know how to edit. As long as you realize it’s an important step in the process, that’s good enough for now. I’ll talk about it much more later.
After the pictures are edited, you have to decide how to get them printed. I researched so many places and decided to go with a company that a lot of people recommended, especially on the Etsy forums. I’m trying to join them selling on there, so thought it was a good place to start. I chose a few pictures, placed an order, and waited forever to get them. I ordered two 11×14 images and then a 5×7 image. They had borders around them so the actual paper was larger. I was so excited to open the package when I finally got them. That excitement lasted about 30 seconds. They were TERRIBLE! Such a waste of time and money and energy!
It was back to the proverbial drawing board. After more test prints, more wasted money, more frustration, I decided that I needed and wanted more control over the process. I hated waiting so long on a company with no customer service to send me the product just to find out it was bad. So after much research, I bought a printer. After many test prints later, I bought a second printer. Then after many more test prints, I bought a new computer monitor. Then after some more test prints, I bought a scanner. Somewhere in there I switched from Gimp to Photoshop Elements as well. This was more for printing purposes, although I do enjoy the Photoshop format more now that I’ve been using it for a while. Tested various paper types, and finally got to an end product I’m proud of.
Whew! That’s a lot of buying! Good thing I already purchased all of this new stuff so I can hopefully help you avoid some of those mistakes and frustrations! If you already own a camera, scanner, or even nicer cell phone, and a newer computer monitor you won’t have to worry about some of this. I’ll be talking more about specifications for camera quality next week.
To recap our (very!) simplified check list on how to get from artwork to prints looks a bit like this:
☐Completed artwork
☐Way to take a picture of artwork
☐Program to edit photo
☐Edit photo
☐Method to print (either a printer or company to outsource)
For next week’s post I’ll dive deeper into picture taking and explain how I thought that my digital camera was good enough only to find out I needed better.
Thanks again for joining me here! Please feel free to ask any questions and give your opinions.
If you’re not subscribed to my lists and would like to be, hit the button below!
SUBSCRIBE